孤舟蓑笠翁,独钓寒江雪

Weex 源码研究 -- 渲染过程

概述

先来看一下网上有开发者绘制的渲染流程图。

效果图

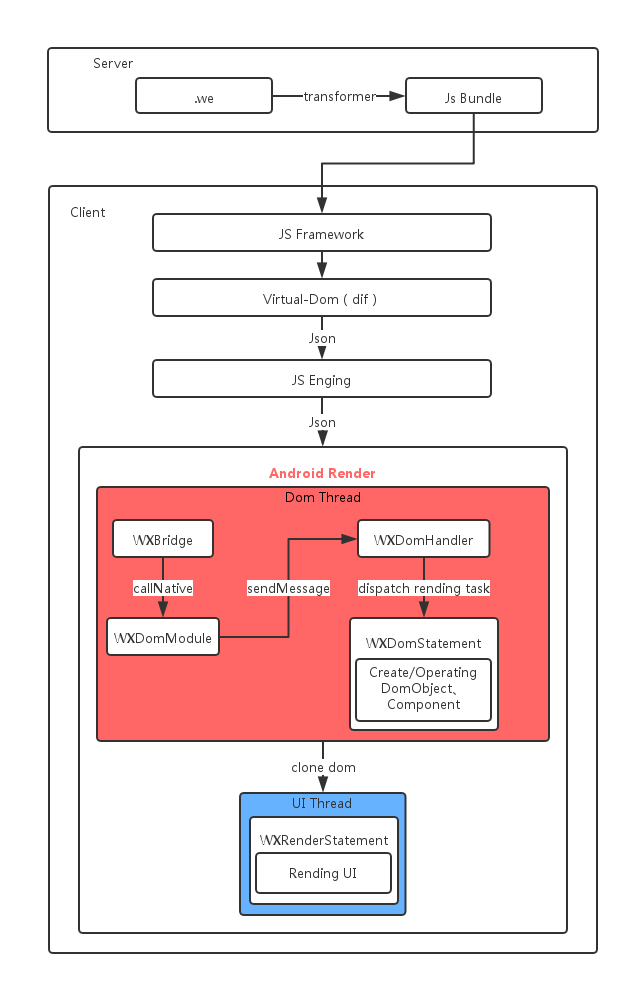
这里目前的版本和这张图相比已经有了改变,比如 WXDomStatement -> DOMActionContextImplWXRenderStatement -> RenderActionContextImpl
渲染的流程包括:

  1. 通过 transformer 将 .we 文件转为 Js Bundle
  2. JS framework 根据 Js Bundle 生成 Virtual Dom
  3. 通过 JS 引擎把渲染数据传给 Native 端
  4. Native 端执行渲染工作,首次渲染时,会将所有结点都交给 Native Render 渲染,在 UI 更新时,计算出最小 dif,让 Native 仅渲染发生改变的结点。

本文着重介绍2-4步骤的渲染工作。

渲染流程图

这个过程我们从 Demo 中的 WXSDKInstance.render() 说起,到 IWXRenderListener.onViewCreated() 回调调用结束。
在渲染执行之前,先注册了渲染监听器,渲染监听器,当渲染结束时,把生成的 RenderContainer 返回。
看一下流程图:

1
2
3
4
5
6
7
8
9
10
11
12
13
14
15
16
17
18
19
20
21
22
23
24
25
26
27
28
29
30
31
32
33
34
35
36
37
38
39
40
41
42
43
44
45
46
47
48
49
50
51
52
53
54
55
56
57
58
59
60
61
62
63
64
65
66
67
68
69
70
71
72
73
74
75
76
77
78
├── WXSDKInstance.registerRenderListener()
└── WXSDKInstance.render()
└── WXSDKInstance.renderInternal()
└── WXSDKManager.createInstance()
├── WXRenderManager.registerInstance()
└── WXBridgeManager.createInstance()
├── WXModuleManager.createDomModule()
└── WXBridgeManager.invokeCreateInstance()
├── WXSDKInstance.setTemplate()
└── invokeExecJS()
└── WXBridge.execJS()
---------JS Engine----------
└── WXBridge.callNative()
└── WXBridgeManager.callNative()
├── WXBridgeManager.getDomModule()
└── WXDomModule.callDomMethod()
└── WXDomModule.callDomMethod
└── WXDomModule.postAction()
└── WXDomManager.postAction()
├── WXDomManager.sendMessageDelayed()
----------------------------
└── WXDomHandler.handleMessage()
├── WXDomManager.executeAction()
├── CreateBodyAction.executeDom()
└── AbstractAddElementAction.addDomInternal()
├── WXDomObject.parse()
├── AbstractAddElementAction.appendDomToTree()
├── AbstractAddElementAction.createComponent()
├── AbstractAddElementAction.generateComponentTree()
├── WXComponentFactory.newInstance()
└── DOMActionContextImpl.registerComponent()
└── WXRenderManager.registerComponent()
└── RenderActionContextImpl.registerComponent()
└── DOMActionContextImpl.postRenderTask(CreateBodyAction)
****************************
├── AddElementAction.executeDom()
└── AbstractAddElementAction.addDomInternal()
├── WXDomObject.parse()
├── AbstractAddElementAction.appendDomToTree()
├── AbstractAddElementAction.createComponent()
└── DOMActionContextImpl.postRenderTask(AddElementAction)
****************************
├── UpdateAttributeAction.executeDom()
****************************
├── CreateFinishAction.executeDom()
****************************
├── UpdateStyleAction.executeDom()
****************************
├── UpdateFinishAction.executeDom()
****************************
├── WXDomManager.batch()
└── DOMActionContextImpl.layout()
└── DOMActionContextImpl.consumeRenderTasks()
├── WXRenderManager.runOnThread()
└── RenderActionTask.execute()
└── CreateBodyAction.executeRender()
├── WXComponent(WXDiv).createView()
├── WXComponent(WXDiv).applyLayoutAndEvent()
├── WXComponent.bindData()
├── WXComponent.updateStyle()
├── WXComponent.updateAttrs()
└── WXComponent.updateExtra()
├── WXSDKInstance.onRootCreated()
├── WXSDKInstance.onCreateFinish()
└── RenderListener.onViewCreated()
└── TestWeexActivity.onViewCreated()
(调用setContentView(view))
└── WXComponent(WXDiv).onRenderFinish()
*******************************************
├── WXRenderManager.runOnThread()
└── RenderActionTask.execute()
└── AddElementAction.executeRender()
├── WXVContainer(WXDiv).addChild()
├── WXVContainer(WXDiv).createChildViewAt()
├── WXComponent(WXImage).applyLayoutAndEvent()
├── WXComponent(WXImage).bindData()
└── WXComponent(WXImage).onRenderFinish()
*******************************************

解析 JS

这一过成比较简单,调用 WXSDKInstance.render() 方法把转换成的 JS 代码给 JS 引擎处理。
这里需要说明一下在 WXSDKManager.createInstance() 方法中,会调用 WXRenderManager.registerInstance 方法:

1
2
3
public void registerInstance(WXSDKInstance instance) {
mRegistries.put(instance.getInstanceId(), new RenderActionContextImpl(instance));
}

这里会获取当前 WXSDKInstance 的 ID,并生成 RenderActionContextImpl 放入到 ConcurrentHashMap 中去。
WXSDKInstance 的 ID 在 WXSDKManager 中生成,每个 WXSDKInstance 实例在上一个基础上加一。

1
2
3
String generateInstanceId() {
return String.valueOf(sInstanceId.incrementAndGet());
}

指令分发

WXDomModule 分发JS发出的指令

WXDomModule 是派发渲染指令的枢纽,提供了 callDomMethod() 和 postAction()方法来派发渲染指令。
先看一下在 WXDomModule.callDomMethod() 方法中对指令的处理。

1
2
3
4
5
6
7
8
9
10
11
12
13
14
15
16
17
18
19
public Object callDomMethod(String method, JSONArray args, long... parseNanos) {

...
try {
Action action = Actions.get(method,args);
if(action == null){
WXLogUtils.e("Unknown dom action.");
}
if(action instanceof DOMAction){
postAction((DOMAction)action, CREATE_BODY.equals(method) || ADD_RULE.equals(method));
}else {
postAction((RenderAction)action);
}
...
} catch (IndexOutOfBoundsException e) {
...
}
return null;
}

这里可以处理的 Action 包括:

  • CreateBodyAction
  • UpdateAttributeAction
  • UpdateStyleAction
  • RemoveElementAction
  • AddElementAction
  • MoveElementAction
  • AddEventAction
  • RemoveEventAction
  • CreateFinishAction
  • RefreshFinishAction
  • UpdateFinishAction
  • ScrollToElementAction
  • AddRuleAction:参考 官网说明
  • GetComponentRectAction
  • InvokeMethodAction

这里的大部分 Action 是既实现了 DOMAction 又实现了 RenderAction 接口的,这种 Action 会执行 WXDomModule.postAction(DOMAction action, boolean createContext) 方法,先在 WeeXDomThread 线程中执行构建 DOM 的操作。然后通过 DOMActionContextImpl.postRenderTask() 生成 RenderActionTask,再后面的批处理操作中处理这些渲染动作。
如果是没有实现 DOMAction 接口的 Action,就执行 WXDomModule.postAction(RenderAction action),直接立即在 UI 线程中执行渲染操作。

WXDomHandler 处理构建客户端DOM的指令

WXDomHandler 处理 WXDomModule 发过来的操作指令,比如

  • MsgType.WX_EXECUTE_ACTION:接受一下 Dom 指令:CreateBodyAction、AddElementAction、UpdateStyleAction、UpdateAttributeAction、CreateFinishAction、UpdateFinishAction
  • MsgType.WX_DOM_BATCH:批处理前面的 Dom 操作,执行渲染动作。这个不是 WXDomModule 发过来的,在 WXDomHandler 这边生成的。2ms 执行一次批处理操作。
  • MsgType.WX_DOM_UPDATE_STYLE:被弃用的方法,更新 style。其实在 MsgType.WX_EXECUTE_ACTION 是可以处理 JS 端发出的 UpdateStyleAction 操作的了,这里保留是为了有些在 Java 侧直接调用的 UPDATE STYLE 操作。
  • MsgType.WX_CONSUME_RENDER_TASKS
1
2
3
4
5
6
7
8
9
10
11
12
13
14
15
16
17
18
19
20
21
22
23
24
25
26
27
28
29
30
31
32
33
34
35
36
37
38
39
40
41
42
43
44
45
46
47
48
49
public boolean handleMessage(Message msg) {
if (msg == null) {
return false;
}
int what = msg.what;
Object obj = msg.obj;
WXDomTask task = null;

if (obj != null && obj instanceof WXDomTask) {
task = (WXDomTask) obj;
Object action = ((WXDomTask) obj).args.get(0);
if (action != null && action instanceof TraceableAction) {
((TraceableAction) action).mDomQueueTime = SystemClock.uptimeMillis() - msg.getWhen();
}
}
// 这里为了每隔三秒执行一次批处理操作
if (!mHasBatch) {
mHasBatch = true;
if(what != WXDomHandler.MsgType.WX_DOM_BATCH) {
int delayTime = DELAY_TIME;
if(what == MsgType.WX_DOM_TRANSITION_BATCH){
delayTime = TRANSITION_DELAY_TIME;
}
mWXDomManager.sendEmptyMessageDelayed(WXDomHandler.MsgType.WX_DOM_BATCH, delayTime);
}
}
switch (what) {
case MsgType.WX_EXECUTE_ACTION:
mWXDomManager.executeAction(task.instanceId, (DOMAction) task.args.get(0), (boolean) task.args.get(1));
break;
case MsgType.WX_DOM_UPDATE_STYLE:
//keep this for direct native call
mWXDomManager.executeAction(task.instanceId, Actions.getUpdateStyle((String) task.args.get(0),
(JSONObject) task.args.get(1),
task.args.size() > 2 && (boolean) task.args.get(2)),false);
break;
case MsgType.WX_DOM_BATCH:

mWXDomManager.batch();
mHasBatch = false;
break;
case MsgType.WX_CONSUME_RENDER_TASKS:
mWXDomManager.consumeRenderTask(task.instanceId);
break;
default:
break;
}
return true;
}

再来看一下 WXDomManager.executeAction() 方法:

1
2
3
4
5
6
7
8
9
10
11
12
13
14
15
16
17
18
19
20
21
22
23
24
25
26
27
28
29
30
31
32
public void executeAction(String instanceId, DOMAction action, boolean createContext) {
// 这里的 createContext 仅在 CreateBodyAction 和 AddRuleAction 时为 true
DOMActionContext context = mDomRegistries.get(instanceId);
// 这是是确保了 CreateBodyAction 之后才能执行其他 Action,AddRuleAction 是不需要 DOM 根节点的
if(context == null){
if(createContext){
DOMActionContextImpl oldStatement = new DOMActionContextImpl(instanceId, mWXRenderManager);
mDomRegistries.put(instanceId, oldStatement);
context = oldStatement;
}else{
// 如果是执行其他 action,在 context 为空的情况下会提示错误并返回。
WXSDKInstance instance = WXSDKManager.getInstance().getSDKInstance(instanceId);
if(action != null && instance!= null && !instance.getismIsCommitedDomAtionExp()){
String className = action.getClass().getSimpleName();
WXLogUtils.e("WXDomManager", className + " Is Invalid Action");
if(className.contains("CreateFinishAction")){
WXExceptionUtils.commitCriticalExceptionRT(instanceId,
WXErrorCode.WX_KEY_EXCEPTION_DOM_ACTION_FIRST_ACTION.getErrorCode(),
"executeAction",
WXErrorCode.WX_KEY_EXCEPTION_DOM_ACTION_FIRST_ACTION.getErrorMsg() + "|current action is" +className, null);
instance.setmIsCommitedDomAtionExp(true);
}
}
return;
}
}
long domStart = System.currentTimeMillis();
long domNanos = System.nanoTime();
// 对应的 Action 执行 Dom 操作
action.executeDom(context);
......
}

构建客户端 DOM

这一节我们以处理 CreateBodyAction 为例来介绍一下渲染过程中构建客户端 DOM 的处理。
先来看一下 CreateBodyAction.addDomInternal() 方法。
dom 参数是代表类似这样 json 字符串的一个对象。
{"attr":{},"ref":"_root","style":{"alignItems":"center","height":800,"justifyContent":"center","width":750},"type":"div"}

1
2
3
4
5
6
7
8
9
10
11
12
13
14
15
16
17
18
19
20
21
22
23
24
25
26
27
28
29
30
31
32
33
34
protected void addDomInternal(DOMActionContext context, JSONObject dom) {
......
Stopwatch.tick();
// 把json对象转换为 WXDomObject 对象
WXDomObject domObject = WXDomObject.parse(dom, instance, null);
Stopwatch.split("parseDomObject");

if (domObject == null || context.getDomByRef(domObject.getRef()) != null) {
...
return;
}
appendDomToTree(context, domObject);
Stopwatch.split("appendDomToTree");

domObject.traverseTree(
context.getAddDOMConsumer(),
context.getApplyStyleConsumer()
);
Stopwatch.split("traverseTree");


//Create component in dom thread
WXComponent component = createComponent(context, domObject);
if (component == null) {
return;
}
Stopwatch.split("createComponent");

context.addDomInfo(domObject.getRef(), component);
//Dom 构建完成,这里把当前Action放入到待 Render 列表中,等待后面的批处理进行Render操作。
context.postRenderTask(this);
addAnimationForDomTree(context, domObject);
....
}

解析JSON:

1
2
3
4
5
6
7
8
9
10
11
12
13
14
15
16
17
18
19
20
21
22
23
24
25
26
27
28
29
30
31
32
33
34
public static  @Nullable WXDomObject parse(JSONObject json, WXSDKInstance wxsdkInstance, WXDomObject parentDomObject){
......
// 获取跟节点的类型,CreateBodyAction时一般为div
String type = (String) json.get(TYPE);

if (wxsdkInstance.isNeedValidate()) {
....
}
// 生成 WXDomObject
WXDomObject domObject = WXDomObjectFactory.newInstance(type);

domObject.setViewPortWidth(wxsdkInstance.getInstanceViewPortWidth());

if(domObject == null){
return null;
}
// 设置属性值,包括 style、attr、event、ref(结点的唯一标识符)、parent、children等
domObject.parseFromJson(json);
domObject.mDomContext = wxsdkInstance;
domObject.parent = parentDomObject;
// 添加一些子节点信息
Object children = json.get(CHILDREN);
if (children != null && children instanceof JSONArray) {
JSONArray childrenArray = (JSONArray) children;
int count = childrenArray.size();
for (int i = 0; i < count; ++i) {
domObject.add(parse(childrenArray.getJSONObject(i),wxsdkInstance, domObject),-1);
}
}

domObject.mDomThreadNanos = System.nanoTime() - startNanos;
domObject.mDomThreadTimestamp = timestamp;
return domObject;
}

生成 WXComponent:

1
2
3
4
5
6
7
8
9
10
11
12
13
14
15
16
17
18
19
20
21
22
23
24
25
26
27
28
29
30
31
32
33
34
35
36
protected WXComponent generateComponentTree(DOMActionContext context, WXDomObject dom, WXVContainer parent) {
if (dom == null) {
return null;
}
long startNanos = System.nanoTime();
// 生成 WXComponent,CreateBodyAction时一般为 WXDiv
WXComponent component = WXComponentFactory.newInstance(context.getInstance(), dom, parent);
if (component != null) {
component.mTraceInfo.domThreadStart = dom.mDomThreadTimestamp;
component.mTraceInfo.rootEventId = mTracingEventId;
component.mTraceInfo.domQueueTime = mDomQueueTime;
}
// 把生成的组件注册给 RenderActionContextImpl
context.registerComponent(dom.getRef(), component);
if (component instanceof WXVContainer) {
WXVContainer parentC = (WXVContainer) component;
int count = dom.childCount();
WXDomObject child = null;
// 添加子节点
for (int i = 0; i < count; ++i) {
child = dom.getChild(i);
if (child != null) {
WXComponent createdComponent = generateComponentTree(context, child, parentC);
if(createdComponent != null) {
parentC.addChild(createdComponent);
}else{
......
}
}
}
}
if (component != null) {
component.mTraceInfo.domThreadNanos = System.nanoTime() - startNanos;
}
return component;
}

渲染

这一节我们以处理 CreateBodyAction 为例来介绍一下渲染过程中对构建客户端 DOM 的渲染处理。
渲染阶段的类和生成 Native 组件的类有些是一一对应的,比如:DOMActionContextImpl – RenderActionContextImpl、DOMAction – RenderAction 等。
CreateBodyAction.executeRender()

1
2
3
4
5
6
7
8
9
10
11
12
13
14
15
16
17
18
19
20
21
22
23
24
25
26
27
28
29
30
31
32
33
34
35
public void executeRender(RenderActionContext context) {
WXComponent component = context.getComponent(WXDomObject.ROOT);
WXSDKInstance instance = context.getInstance();
...
try {
Stopwatch.tick();
long start = System.currentTimeMillis();
// 调用 WxComponent.initComponentHostView() 生成Host View,前面介绍过,`initComponentHostView()` 是组件必须实现的方法。
component.createView();
...
start = System.currentTimeMillis();
// 设置lalyout,padding和事件监听
component.applyLayoutAndEvent(component);
...
// 设置style、attrs和extra
component.bindData(component);

...
if (component instanceof WXScroller) {
WXScroller scroller = (WXScroller) component;
if (scroller.getInnerView() instanceof ScrollView) {
instance.setRootScrollView((ScrollView) scroller.getInnerView());
}
}
// 通知一些回调
instance.onRootCreated(component);
if (instance.getRenderStrategy() != WXRenderStrategy.APPEND_ONCE) {
instance.onCreateFinish();
}
component.mTraceInfo.uiQueueTime = mUIQueueTime;
component.onRenderFinish(WXComponent.STATE_ALL_FINISH);
} catch (Exception e) {
...
}
}

生成 Host View:
其实就是生成对应的Android View的过程。

WXComponent.createViewImpl()

1
2
3
4
5
6
7
8
9
10
11
12
13
14
15
16
17
18
19
protected void createViewImpl() {
if (mContext != null) {
mHost = initComponentHostView(mContext);
if (mHost == null && !isVirtualComponent()) {
//compatible
initView();
}
if(mHost != null){
mHost.setId(WXViewUtils.generateViewId());
ComponentObserver observer;
if ((observer = getInstance().getComponentObserver()) != null) {
observer.onViewCreated(this, mHost);
}
}
onHostViewInitialized(mHost);
}else{
WXLogUtils.e("createViewImpl","Context is null");
}
}

WXDiv.initComponentHostView()

1
2
3
4
5
6
@Override
protected WXFrameLayout initComponentHostView(@NonNull Context context) {
WXFrameLayout frameLayout = new WXFrameLayout(context);
frameLayout.holdComponent(this);
return frameLayout;
}

至此,渲染流程介绍完毕。